
E-Scouting for Whitetails: Discovering Hidden Gems on Mapping Apps
Master e-scouting for whitetails with topo, leaf-off imagery, and lidar. Find bedding, funnels, and zero-impact access before you walk a single yard.
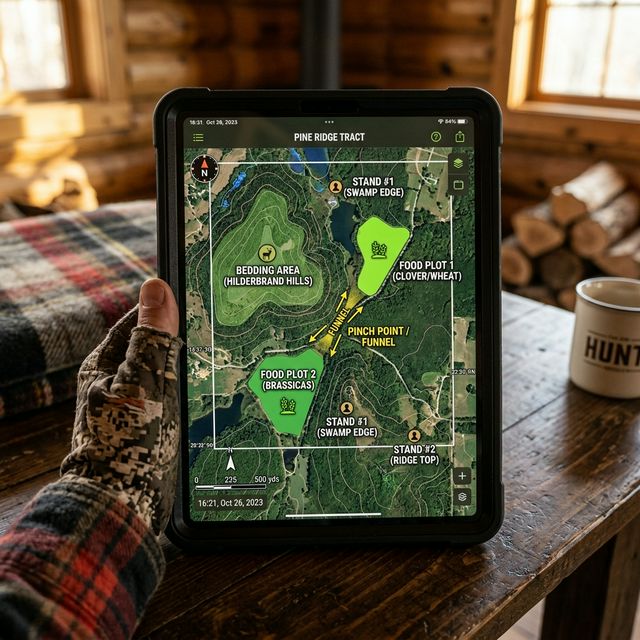
In modern whitetail hunting, boot leather alone rarely beats hunters who already know the map. E-scouting—digital map work with tools like onX Hunt, HuntStand, Gaia GPS, or Google Earth Pro—lets you mark funnels, bedding benches, vegetation edges, and ownership lines before your first hike.
The best public-land and lease hunts are often won in July and August, when you spend quiet hours stacking layers and building a shortlist of 10 to 20 waypoints. Field time then verifies sign instead of wandering 2,000 acres hoping for luck.
What Layers Matter Most on a Hunting Map App
E-scouting is not casually zooming satellite green. You are looking for the intersection of security cover, food, and topography. Stack these layers every session:
- Leaf-off or winter imagery: See hardwood floors, cedar thickets, logging trails, and tiny swamp openings hidden under summer canopy.
- Topographic contours: Tight lines mean steep ground; wide lines mean flats. Mark benches (flat shelves on a slope) and saddles (low dips in a ridge)—deer prefer the path of least resistance.
- Lidar / timber-cut history: A 3- to 7-year-old clear-cut becomes dense sapling cover. Mature bucks often bed on the edge where they can see and scent-check approaches.
- Public/private boundaries: Confirm ownership before you plan access. Give questionable lines a 50-yard buffer—GPS drift of 20 to 40 feet is common under canopy.
Save each candidate as a named waypoint with wind notes (e.g., “SW bench – NE wind only”).
How to Spot Bedding Areas From Satellite and Topo
Mature bucks choose beds for downwind scent security and a visual advantage. On the map, prioritize these “red zone” features:
- Leeward benches: With a prevailing west wind, bucks often bed on the east side of a ridge, about one-third of the way down from the crest. They face downhill and let wind over the ridge cover their back.
- Swamp islands and oxbows: Small dry humps surrounded by water or cattails force noisy approaches. Pair this read with swamp buck tactics when water is the main security.
- Edge of nasty cover: Where mature timber meets briars, CRP, or young cuts—especially within 75 to 200 yards of food.
Mark bedding as a polygon, not a single pin. Then draw likely exit trails toward evening food.
Planning Zero-Impact Access Routes
Finding deer is maybe 20% of the job. The other 80% is arriving without announcing yourself. Use the map to design entry and exit:
- Thermal awareness: Evening air sinks into bottoms. Walking a ravine at dusk can push scent ahead of you into bedding. Prefer ridge backsides or creek beds that keep scent off the target.
- Topographic shadows: Enter on the back side of a ridge and crest only at the stand tree. Avoid skylining yourself on open ridgelines.
- Distance from parking: Waypoints that require 0.8 to 1.5 miles of hiking often hold more daylight bucks than spots 200 yards from a gravel lot.
- Wind-specific setups: Build at least two access plans per area—one for SW/W winds and one for N/NW.
For terrain that physically squeezes deer into narrow lanes, cross-check your pins with pinch points and funnels.
Property Boundaries and Digital Accuracy
The boundary layer is non-negotiable, but apps are not surveys.
- GPS under heavy canopy can drift 30+ feet.
- A rusted fence and faded “No Trespassing” signs override your screen.
- Game wardens will not accept “my app said public” as a defense.
When lines look fuzzy, walk the obvious physical markers, stay wide, and ask landowners when in doubt. One trespass complaint can end access for years.
From Screen to Dirt: A Verification Checklist
Digital work without ground-truthing creates pretty maps and empty sits. Use this field checklist:
- Confirm fresh rubs, beds, droppings, or tracks within 50 yards of your pin.
- Note actual wind and thermal behavior at dawn and dusk—not just the forecast arrow.
- Identify 2 to 3 hangable trees (or saddle trees) that keep your scent off the trail.
- Mark silent access (logging road, ditch, creek, or leaf-raked path).
- Delete or demote waypoints that only look good on satellite.
If you rely on cameras after e-scouting, managing trail camera data keeps inventory from turning into a photo dump.
Common E-Scouting Mistakes
Avoid these patterns that waste seasons:
- Hunting every green field edge because it looks “pretty” on summer imagery.
- Ignoring leaf-off imagery and missing interior trails and thickets.
- Pinning bedding then walking through it in September “just to check.”
- One wind plan only—a SW-only stand dies on a northeast front.
- Too few backups—arrive with 12 to 20 options on a multi-day public trip, not three.
- Skipping ownership layers until opening morning.
For DIY travel hunts, pair this process with out-of-state whitetail planning so tags, lodging, and waypoints are ready before you burn vacation days.
Gear and Timing for Map Work That Pays
You do not need every premium layer on day one. Start with:
- One mapping app with offline tiles downloaded for your county
- A notebook or cloud folder of waypoints with wind notes
- Historical imagery toggles (2 to 5 years back) to spot new cuts and food changes
- A simple ranking system: A (hunt first cold front), B (backup), C (scout only)
Best calendar windows:
- June–August: Build inventory and access plans without pressuring deer.
- Early September: Quick ground checks on A/B pins only.
- In-season: Re-rank after crops come down, flooding rises, or heavy weekend pressure.
Mobile hunters who hang and move often should also study saddle hunting—many “impossible” trees next to e-scouted funnels only work with a light system.
Seasonal Map Reviews That Catch Pattern Shifts
One July e-scout session is not enough. Re-open the same pins after major landscape changes:
- Crop harvest: Beans and corn coming down overnight can erase summer staging lines. Remap field edges and look for new interior oak or brassica destinations within 200 to 400 yards of prior bedding.
- Flood pulses: After heavy rain, oxbows and swamp islands shrink or grow. Update water polygons before you commit a morning sit.
- Logging: A fresh cut can create bedding in 2 to 4 years—or destroy last year’s funnel. Historical imagery from the past 24 months reveals new skid trails worth walking.
- Neighbor pressure: If a new parking pull-off appears on the public map, demote nearby A-pins and promote deeper alternatives.
Build a simple spreadsheet: pin name, lat/long or app ID, primary wind, last ground-truth date, and grade (A/B/C). Hunters who treat maps like living documents kill more than hunters who screenshot once in August.
Reading Deer Sign Against Your Digital Hypothesis
When you finally walk a pin, grade the hypothesis honestly:
- Confirm: Fresh tracks sized like mature bucks, rubs 4+ feet high, beds with droppings on the leeward shelf you predicted.
- Adjust: Sign exists but 60 yards off—move the waypoint, do not force the old tree.
- Kill the pin: Pretty satellite, zero sign, heavy human trails—drop it from the hunt list.
Spend 20 to 40 minutes per A-pin, not three hours thrashing bedding. Take phone photos of rub lines facing the direction of travel, then plot them as arrows on the map that night. Directionality turns random rubs into a usable morning-versus-evening plan.
If public pressure is brutal near roads, force yourself to keep at least five pins beyond the one-mile mark. That distance filter alone often separates daylight mature bucks from nocturnal roadside deer.
Frequently Asked Questions
How many hours should I e-scout before a hunt?
For a new public tract, plan 8 to 20 hours of map work before the first serious scouting hike. For familiar private ground, 2 to 4 focused hours before season often refreshes food, cuts, and access.
Is Google Earth enough, or do I need a paid hunting app?
Google Earth Pro is excellent for historical imagery and elevation. Paid apps win on offline maps, ownership layers, and trail marking in the field. Many hunters use both.
What is the single best terrain feature to mark first?
On hills, start with saddles and leeward benches. In flat country, start with creek crossings, swamp islands, and timber fingers between ag fields.
When should I switch from e-scouting to boots-on-the-ground?
When you have a ranked shortlist. Ground-truth A and B pins, then stop punching bedding. More walking is not more scouting if you educate the deer you planned to hunt.
Can WildSnap help after I pick camera sites from the map?
Yes. Once cameras sit on the corridors your maps predicted, WildSnap can help sort species and timing so you hunt the pins with real daylight activity—not every trail that looked good on satellite.
E-scouting does not replace time in the timber. It makes that time surgical. Stack layers, protect access, verify with light boots, and you will spend opening week in the right zip code instead of learning the property the hard way.
Turn your trail camera data into scouting intelligence
Wildsnap AI filters noise, recognizes species, and surfaces activity patterns from your own photos.
No credit card
Wildsnap • Open beta
Turn your trail camera data into scouting intelligence
Wildsnap AI filters noise, recognizes species, and surfaces activity patterns from your own photos.
No credit card